
In this episode we interview landscape photographer Josh Cripps.
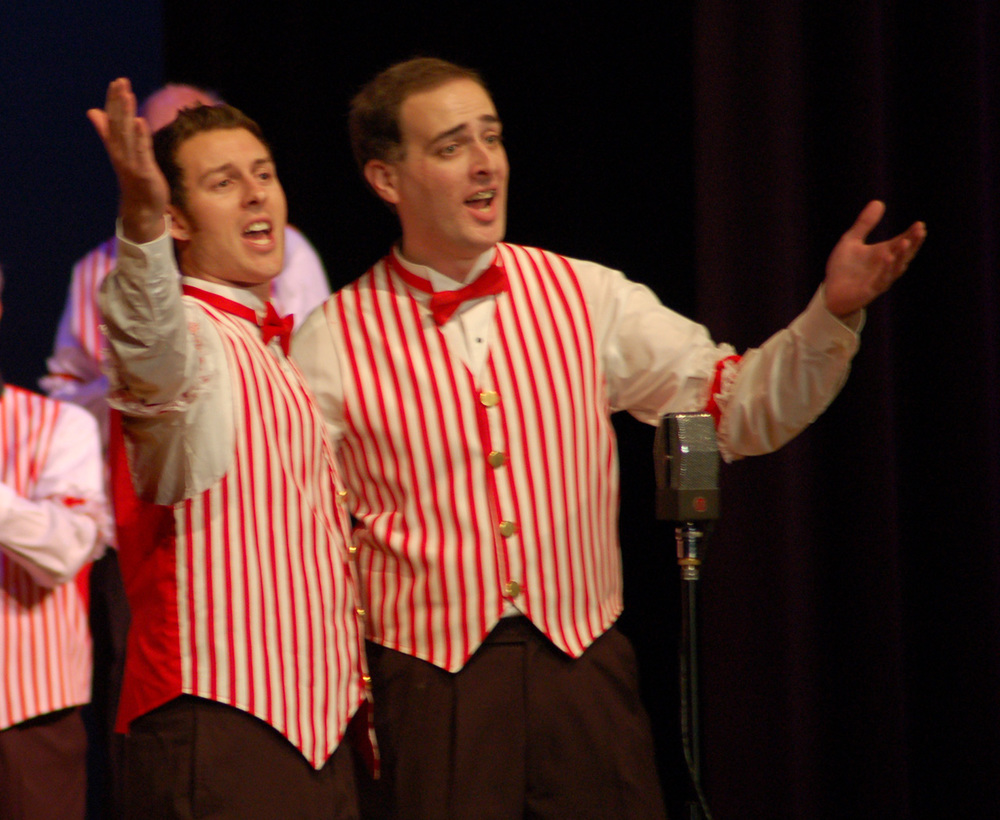
Share - The Barbershop band.
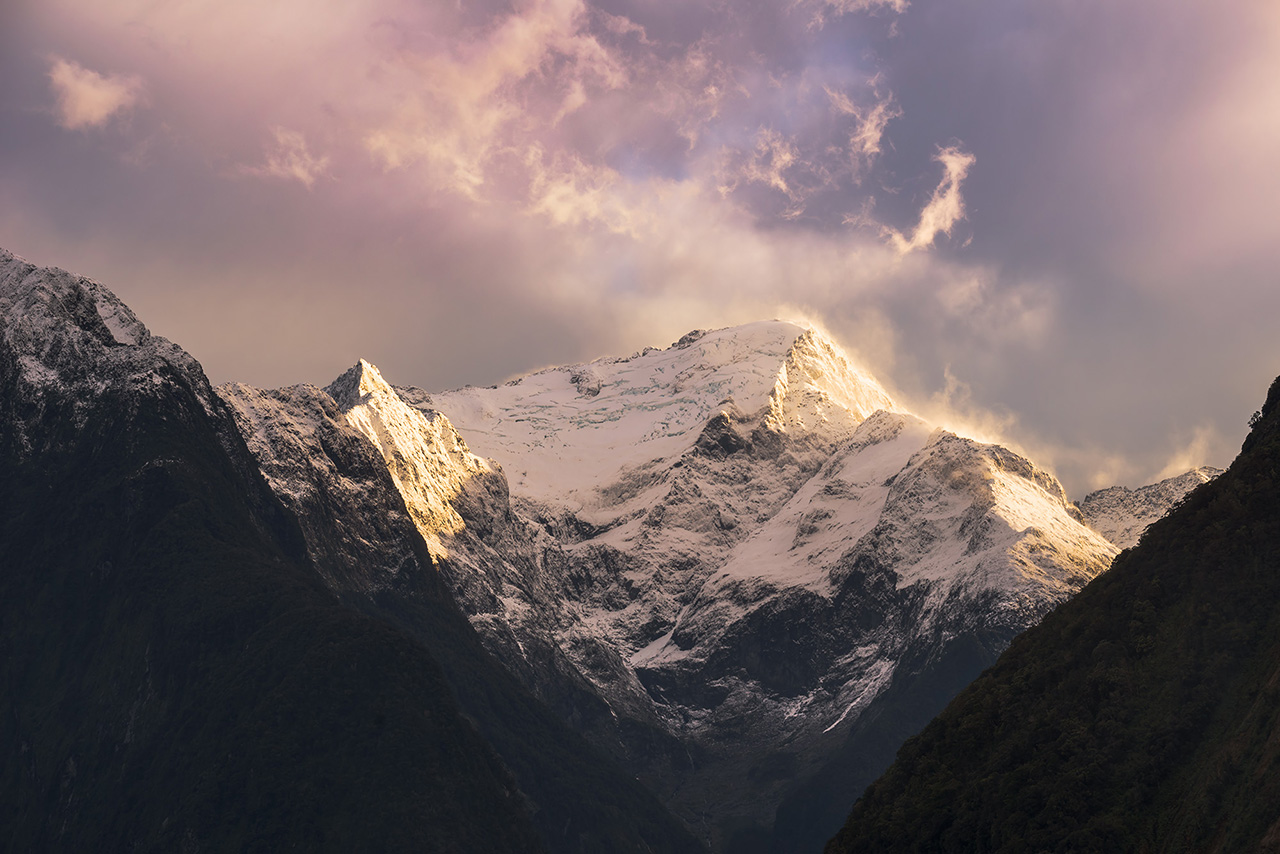
Inspire - Feeling in in New Zealand.
Create - Photoshop tip for making you image pop.
Checkout these awesome Photoshop deals Josh has for you.
Photoshop Advance Techniques Bundle
To find out more checkout the Share Inspire Create Lounge Here>>
Enjoy & Share the Photo-Love by sharing this post.
Brent & Johny
I want to
make
money from
my
photography
I want to
learn to take
stunning
Portrait
image
I want to
learn to take
amazing
Landscape
pictures
In this episode:
(01:22) Josh and the Barbershop band
(01:34) Used to sing in a barbershop chorus
(02:24) Played the drums for like 12 years
(04:13) Feeling it in New Zealand.
(04:29) Milford Sound, New Zealand
(06:32) Photography is an extension of your experience of the natural world
(08:16) Being in that one spot is enough because that one spot is amazing
(09:35) Photographers go through progression or regression
(09:58) Let the landscape talk to you
(11:13) Defining happiness in a lot of different ways
(13:58) What is success really come down to?
(15:58) Photoshop tip for making you image pop.
(17:14) Cool way you can increase color separation in your images
(18:23) Whole technique just using a couple of curve adjustment layers
(20:40) Easy technique you can use to target these curves adjustments into just the area that you want

Episode Highlights:
Johny's Twitter
Brent's Twitter
Joshua Cripps Website
Joshua Cripps Facebook
Share - Josh and the Barbershop band.
used to sing in a barbershop chorus
played the drums for like 12 years
Inspire - Feeling it in New Zealand.
Milford Sound, New Zealand
have a wide angle lens
Photography is an extension of your experience of the natural world
Being in that one spot is enough
zoomed in on this one spot
light was beautiful
water vapor is vaporizing off the snow where the sun is hitting it
Wide angle
Grad filter
Foreground object
progression/regression
the nature or the landscape talks to you
Defining happiness in a lot of different ways
happiness is not wanting to be anywhere else
enjoying the moment on the spot where you're in
letting the landscape speak to you and letting yourself feel it
What is success really come down to?
it gives you the lifestyle success that you’re seeking
helping other people achieves their goals
help people become better photographers
Create - Photoshop tip for making you image pop.
Increase color separation
Accentuate or highlight or differentiate certain colors
1. grab a curve adjustment layer
2. grab the little hand tool
increase the tonal separation
click and drag up on the areas you want to make bright
click and drag down on the areas that you want to make darker
3. add another curve adjustment layer
select red channel
Grab hand tool
Click and drag the area where you want more reds to appear
click and drag again in the area where you wanted to diminish the amount of visible red
Easy technique you can use to target these curves adjustments into just the area that you want
click on curve adjustment
click on the layer mask for the bright curve adjustment
go up to image then apply image
Introduction
Johny: Hey Guys, what’s up? It’s Johny here and welcome to another episode of the SIC show. And as always I’m super pumped to be here and I’m here with my main man B. How are you, Buddy?
Brent: Look at our new studio.
Johny: Look at our studio. Man, this is epic. This is like the best sea screen I’ve ever been Man. I love this location.
Brent: And we got that big bright light up there.
Johny: It’s a big natural thing in the sky.
Brent: So Buddy, what’s on the SIC show?
Johny: So this week on the show, we interviewed awesome photographer Josh Cripps and find out about Josh and the Barbershop Band.
Brent: Yeah, and Josh is going to inspire us with an amazing image from Mt. Sefton, feeling it in the sound. And he’s got an epic little Photoshop tutorial on how to make your images popped.
Johny: Cool Man.
Brent: Enjoy.
Johny: Let’s get into it.
Josh and the Barbershop Band
Brent: Josh, share something with us and to our audience that’s entertaining and not many people would know about you.
Josh: Okay, so I think a lot of people would find unusual about me is that I used to sing in a barbershop chorus. So, I assume you Guys are going to be displaying this picture up on the show.
Brent: Yes.
Josh: While we’re talking about this but you can see there in beautiful stripe red vest. And I used to have hair which was pretty awesome I have to admit. But yeah, I used to sing in a barbershop chorus and that is me singing. Do you Guys know Monty Python?
Brent: Yes, I know Monty Python; are you on the left or right?
Josh: I’m on our right or our left stage right.
Brent: Stage right, so our left.
Josh: We were singing the Galaxy song from the Meaning of Life by Monty Python; the big finale number there.
Brent: Okay, perfect. That’s interesting. I love the stripes and the little red bow tie.
Josh: Yeah, tie it up with all tight. Actually, I think it was like a clip on or a Velcro. It was really easy to tie.
Brent: Okay, awesome. So, how did you get into that? What drive you to sing?
Josh: Yeah, I don’t know. I always just enjoyed music. I played the drums for like 12 years or something, growing up. And I really enjoyed singing. So when I got my first full time job after college, I was in this very stable spot. And I could start to branch out and explore some of my hobbies and one of them, “Oh heck, I want to go and join a barbershop chorus and see what that is all about”. And they said when I first showed up they’re like, “What part do you sing?” and I said, “Beats the heck out of me”. They said, “We need guys. We need more guys to sing the melody. So, go sing the melody.” And so they had me do that. And I was never actually very good at it because my singing range is more comfortably in the bass region.
Brent: Okay.
Josh: So, I could sing like “(sing bass tone)” and they were like, “You had to go so high to be a lead sing.” And I could never do it. But still I had fun with it for about 18 months or something and then I moved so I got out of it and that was that. But I think it was my glory days of red stripes and a bow tie.
Brent: Yeah, sexy Man. That’s awesome. Thanks Josh for that.
Josh: Yeah, you can see how many chicks I got after that concert.
Brent: Yeah, lots.
Josh: Yeah, you have no idea. Actually, it might be a very good idea.
Brent: A lot of groupies following you around there.
Josh: Not exactly but yeah.
Brent: I like the hair, Man. It looks like your hair’s gone a little south there.
Josh: Yeah, I noticed that it stops growing out of my head and it just started growing inside.
Brent: It’s on the chin now.
Josh: Its gravity; getting old. It just migrates down.
Brent: Yeah, it happens to me too, don’t we?
Josh: Yeah, it’s like we share the same barber.
Brent: Yeah, here we go.
Feeling it in New Zealand
Brent: Inspire us with one of your amazing landscape images and I’ll pull it up now on my screen over here. And tell us a little story about it. So, I believe or the first one that we’re going to show is from New Zealand, right; the Milford Sound?
Josh: Actually, both of the photos that you’re going to show to the audience here are from Milford Sound. They’re actually from the same spot.
Brent: Okay.
Josh: But the one that’s got all the, oh, well let’s see. Okay, so this one. I can see what you’re seeing. Perfect, okay, so this is Milford Sound. In case you Guys haven’t seen it. You should definitely go there because it’s sort of ridiculously beautiful and amazing. And when I first got into landscape photography, I was really inspired by Galen Rowell. He’s definitely to this date my number one inspiration. And what I love about his photography was he had this ability with the photo to make you feel like you’re standing in the scene with him on that spot watching this event unfold. And I love that. I love the sense of “Wow, I can create this connection between the viewer and my photos so they feel like they’re standing in the photo.” That’s awesome. And once I found out how to do that, wide angle lens, getting close to your foreground; I was addicted man. That’s all I shot. It’s like the ledge and you could’ve put super glue between my lens and my camera and I would’ve been happy with that. Always have a wide angle lens on like 99% of the time of shoot with a wide angle but the problem was I got to a point where it almost became this constraining box before me. And so as a landscape photographer, as a nature photographer, I had built this definition of myself about really realizing it that it was like, “Okay, it has to be a wide angle, it has to be shot at sunrise or sunset, it has to be raise kind of light, you know. And if the scene that I was photographing didn’t fit within those criteria so “Oh, it sucks”, you know. I would’ve packed up my stuff and go home and watch Breaking Bad. You know, I realize that the more and more that I’ve been doing photography for the last 3 years, I’ve been moving from that goal oriented approach of “I want to come with a picture” to more of when I think photography really should be which is an extension of your experience of the natural world. So as I’ve got into that mindset it’s more of like, “I just want to be in this beautiful place”, and experience what it has to show me. I’ve found those barriers becoming more and more fluid and flexible and so instead of approaching the scene and saying, “Okay, this is my style of photograph” or saying, “What is my style?” It doesn’t have to be wide angle, sunrise, sunset. It’s just whatever speaks to me, whatever the scene is saying to me, I want to try and capture that because that’s what I’m feeling. And so the 2 pictures you’ve got here, the one is of Milford Sound that sort of my typical “Okay, here’s a wide angle shot of Milford Sound.” But you can see the light is boring. It’s super boring. I mean there’s some drama in the clouds but come on, it’s going to won any awards. It doesn’t make me feel a whole lot other than it’s the beauty that’s standing there. But I notice when I was taking at sunrise and then as I’m standing there I noticed there’s a little packet of light opening up above that pen broke which you can see way, way, and way in the distance in the lower right hand corner of that wide angle shot. And the light is sort of breaking up the sunrise. So right there exactly. So it’s breaking up by this beautiful paint light shining in just over that one spot. And me from a few years ago, it would’ve been like, “Oh, that’s cool.” But I really wish that light would extend to the entire sky so that I can fit in the right wide angle. But now I just like, “You know what? Being in that one spot is enough because that one spot is amazing”. And so instead of being stuck in this box, I zoomed in with my telephoto lens which I rarely do. I almost never should telephoto landscapes. But in this particular case having that flexibility I zoomed in on this one spot where the scene was to me is breathtaking. And the light was beautiful and that you could see the snow kind of vaporizing or the water vapor is vaporizing off the snow where the sun is hitting it and lighting up with this beautiful display of light. And so I zoomed in really tight and just got this frame. And it ended up being one of my favorite shots of the entire 2 months trip that I was there in New Zealand photographing and I know that it’s entirely due to the fact that I’ve stopped myself from rigidly complying with those like checklist approach to photography of has to be a wide angle, you have to have a grad filter, you have to have a leading line, I have to have a foreground object, you know. So like “No, that’s what I see; that one little spot. That’s what’s speaking to me. And now I have this wonderful memory of this experience from that tiny little section there”.
Brent: Awesome, Josh. And I agree with you Man. I think it’s maybe a progression that we photographers go through, you know. Initially, you’re out there and you have to create something. You’ve got a goal and you’ve got to get at least some kind of an image taken from a scene. And then maybe as we mature, we progress or regress, whatever you want to call it. You kind of let the landscape talk to you. You feel it with feelings instead and Johny recently said this, you know. Sometimes you’ll go down and I’m the same way. We go down somewhere to photograph and we just don’t feel it and then you just don’t photograph or you get to a place that actually talks to you or the landscape talks to you and you feel it so you’ve gone and photograph it. And I love that Man. Thank you so much for inspiring us with that amazing image and telling us a story behind it. You know the progression that you’ve gone through. I mean, do you think other photographers go through the same thing where they’re initially goal oriented and have got to achieve this certain things and then off for a while they start shooting because they enjoyed just for the enjoyment or the nature or the landscape talks to you or if you’re photographing a portrait, the person that’ you’re photographing actually inspires you keep going; what do you think, Josh?
Josh: I hope so. Because I think that if you are photographing for that goal oriented purpose, I think ultimately it’s a little bit of a hollow experience. You know I think a lot of people would define happiness in a lot of different ways but I have a very simple few of it and at least one part of it. For me, I would say happiness is, not wanting to be anywhere else which means you’re in a place, you’re in a spot, you’re in that moment, and you’re enjoying it. You’re not thinking about “Oh, I can’t wait ‘till tonight” or “I can’t ‘till tomorrow”, “I’m bored”. “I’m here now and this is fulfilling my spirit. I’m happy.” Happiness is, not wanting to be anywhere else and I think if you’re photographing with a mindset of “Oh, I have to produce an image. What’s this image going to look like when I get back and process it and then put it up?”, “Is it going to get good result on 500px?”, “Am I going to hit the front page?”. Rather than “What is the experience right now that I’m in?”, “I think I miss out on a lot of that”. I think you miss out on that satisfaction and that fulfillment of your spirit of just letting the landscape speak to you and letting yourself feel it. And I think the more you open yourself up that way, the more you feel it like in conditions. Otherwise, you won’t normally shoot and go “Okay, this is kind of blob over here. But, look at that way flax has reflected on the water right there” like I would never noticed that otherwise except I’m not you know, confining myself. So, I hope everybody go with that regression because it’s very satisfying to get to that point where it’s just like “Wow, just to be here in this minute is a beautiful thing.”
Brent: Yeah, totally. And I think you can actually you know, transfer that into life like I have in the last couple of years. Really started to live now and not live for the future. You know, I used to work really hard and stress myself out in my photography business because one day I’ll have this money, and time, and the freedom to actually enjoy it. And then I actually realized that one day it’s never going to happen. It’s actually now. You’ve got to enjoy the journey because that’s all you got. You only got the “Now”. There’s no future, there’s no past really. And past is a memory and the future hasn’t happened yet. So, you only got now. So yeah, I’ve been reading a lot of books on that recently you know. It’s really interesting to talk about that.
Josh: I agree with you 100%. We’ve got a group on Facebook for sharing photograph knowledge with other photographers and at the end of the year last year we talked about what were your successes for the year and what were your failures and things like that. I remember when everyone was talking about you know, I had these great sales and I had these great campaigns and all this. And that’s great. That’s awesome. I love hearing about successful things that people are doing. But for me, I realized like what is success really come down to? In terms of you know, “Am I achieving like a better penetration of my Ad campaign?” or “Am I getting better or making revenue?” Like what is that really mean unless it’s being translated into like you said a lifestyle success where you are in this minute and you can say “Why?” Because I live right outside Yosemite; one of the best places for not only photography but climbing, hiking and all sort of stuff. Like what is it all mean? All these great you know, if I can sell a thousand copies of a print if then tomorrow I just turn around and go “How can I sell a thousand and one?” Or let’s say “Wait a second; let me take a day off. Let me go enjoy this beautiful area where I live. It’s wonderful.” Like that’s the point. You got to enjoy it.
Brent: Yes.
Josh: For me, that’s the point. You can measure success as much as it gives you the lifestyle success that you’re seeking which I agree. You can just run yourself to another ground like that.
Brent: Yeah, totally. And also I think you can measure by who you’re helping and you’re actually helping other people achieve their goals. So for instance, Johny and I are in the Share Inspire Create lounge, our community. For me, the success there is how many people I can actually help become better photographers. And I know you with your workshops too maybe that’s a keeper performance indicator, Josh. How many people can you actually help in this workshop and you can actually enjoy helping people. You know, that maybe something too that you can talk about. So, that’s awesome Josh. Thank you very much for inspiring us with that awesome image and the nice talk we’ve just had.
Photoshop tip for making you image pop
Brent: So I believe you’ve got something for our audience. It’s one of your videos. On the Create part, we actually teach something. So, tell us a little bit about this video and then we’ll stick it into this interview.
Josh: Okay, very cool. Yes, so I’m going to talk about the videos and it’s going to talk about a little bit of Photoshop. So it’s going to be a little bit technical but the whole idea is that sometimes when you’re processing an image, you might say “You know, I wish that the clouds were a little more red or the snow in the scene is a little more blue or something like that”. You know, what’s the best easy way to create that color separation between the two? And it turns out that there’s a beautiful, very simple, very easy way to do this in Photoshop. It’s an amazingly, powerful but targeted and precise and importantly this is a key thing, this is an easy technique. So, if you’re at least possibly familiar with Photoshop, this is something that you can easily bring in your repertoire and ever since I started developing it over the past few months. Now I used it in all my images. It’s just super cool and I don’t want to spoil the surprise. We can get into the video and showcase it that way.
Brent: Okay. Alright, we’ll get into it now.
***
Josh: Good morning boys and girls, ladies and gentlemen, dogs and cats. Welcome to Professional Photography Tip. My name is Josh Cripps and you can find me on Instagram and Facebook at Joshua Cripps Photography. Today, I want to show you Guys a really cool way you can increase color separation in your images and areas where you want to accentuate or highlight or differentiate certain colors. So, let’s dive right in. This is a photo that I took on a snow camping trip in Yosemite back in May of 2014. And this photo has gone already through a fair bit raw processing and I going to talk a little bit more about that later. But this is the result of the photo after the raw processing is done. And you can see here in the foreground, these pillows of snow have some slightly lighter areas and have some slightly darker areas. And what I like to do is you can barely, barely make out the fact that these lighter areas are reflecting more of this sort of purple warm light and the shadow areas are reflecting more of the blue light of the early morning and the sky. So, if there’s a cool way and easy way that I can accentuate that difference then I think it’ll really help me those parts of the snow stand out. So, it’s actually super simple to do and let me just delete this. Nah, I don’t want to delete it. Who knows when you might need something later? We’ll just make it invisible. Alright, so first thing we need to do is we’re going to be doing this whole technique just using a couple of curve adjustment layers and you’ll see how amazingly easy this is. So, first things first; grab a curve adjustment layer, pop it up. Now, grab the little hand tool here which is the targeted adjustment tool. First thing we want to do is increase the tonal separation, the lights and dark between those brighter areas and darker areas. So with the hand separated, you just simply click and drag up on the areas you want to make bright such as this pillow top here. And then you click and drag down on the areas that you want to make darker such as the shadow areas and something like this. Okay, cool. Now, you can see the tops of these pillows, they’re already starting to stand out a little bit more from the shadows here and the background. Even though they’re brighter and the shadows are darker, there isn’t any color information being separated out of here. So, how do we do that? It’s very easy. Just add another curve adjustment layer. Now, instead of RGB channel, we’re going to think about the colors in our images and work on those channels. So, for example, I said that the pillow tops here are reflecting a little more of the warmish reddish light from this crazy lenticular cloud, so instead of working on RGB I’m actually going to select my red channel. I do the exact same thing. Grab my hand tool. Click and drag the area where I want more reds to appear. Right here the pillow tops and bring those up. And then I’m going to click and drag again in the area where I wanted to diminish the amount of visible red. Just like that. Now, I also maybe want to bring out a little less blue in this area. So I’m going to go on my blue channel, click and drag down on the pillow tops to reduce the amount of blue in them and then click and drag up in the shadows to accentuate the blue, there. Very, very cool. Very, very easy and you know what? Maybe I want to see a little more reds in that pillow tops. So, I’m just going to drag that up a little bit more, something like that. Okay, nice. Now, that’s super easy. You’ll see that it had some unintended side effects. One, it increase the contrast throughout the image to sort of a chunky amount that I don’t like and two, it really made the sky go kind of thermal nuclear. So, now I’m going to show you an easy technique you can use to target these curves adjustments into just the area that you want. You can see that the snow is quite bright and the areas that it put too much contrast in then with the trees and the mountains are quite dark. And Photoshop has a really built in way. You can use that light and darken information to create a selection for masks. So, what I’m going to is click on my curve adjustment. This is my bright curve adjustment. And this one I’m going to rename my colors adjustment. So, click on the layer mask for my bright curve adjustment then go up here to image then apply image. What that does? Is make some black and white copy of the image and saves it as a mask. That’s the mask for our bright curves adjustment. And if I turn that on and off you can see now how all of a sudden it’s only affecting the snow and the sky. It’s not affecting the mountain or the trees at all. And that’s because I told it not to through that apply image. Now, I’m going to do the exact same thing for my color curves adjustment here. Instead of going image and apply image, I’m just going to hold up alter option, click on my thumbnail mask and drag it up and it’ll ask me if I want to replace the layer mask here and just click yes. So now, both my color and my brightness curves are only affecting the bright parts of the image than with the snow and sky. So, if I don’t want them to affect the sky, what can I do? Really simple, I’m just going to select them both, hit control or command G to group them into a layer, add a layer mask on that and then I’m actually just going to take a black brush at a low opacity and just kind of mask out the sky a little bit like that. So now, my adjustment is only affecting snow. And well, you know, you can be a little more careful with your curves adjustment in the sky. But check that out. How cool is that? How much we really brought out the color separation and tone of values in the snow. Look at this area right here where these ridges are caught by the sun. We go from standing out almost nothing at all to really just popping out. And you can see it throughout the image. These areas here, how much you bring out that color separation and make those areas pop. So that’s it. That’s the technique. Super simple and you can use that anywhere you like. You can do it up here in the sky. Make a couple of curves adjustments; bring out the blue maybe and the shadows and the reds and the highlights to make that cloud; bring out the texture and color a little bit more and make it a little bit pop. So, as I mentioned earlier, this photo had already done some raw processing on it. I’m going to show you what the original look like. Okay, so this is the photo straight out of the camera as I took it that way. And then this is the final photo that I edited completely using those curves adjustments, using some vignette, a little bit of exposure, blending, some texture adjustments and contrast adjustments throughout it. So, that’s straight out of the camera; that’s the final image. If you want to see how I did that; how I took it from start to finish including all the raw processing, those curves adjustments you just saw, exposure blending; all kinds of other neat techniques like dodging and burning? I have a full walk through on my website. You can just click right here on this icon’ that’ll take you right to the walk through. You can see exactly how I took that photo from start to finish. And if you like this video, I will be honored if you subscribe to my channel; share with your friends or you could also sign up for my newsletter to get lots and more Photoshop and photography tips just like this as well as exclusive content like assignments that you can follow to improve your own photography and have a good time. Alright, thanks everybody for watching. I’ll catch you next time. Until then, have fun and happy shooting.
***
Johny: Man that was a great interview you have with Josh. I really, really enjoyed it Buddy. And to find out that he was in a barbershop band that is amazing. That photo is just hilarious. I love that. I love it.
Brent: Doing the bow tie.
Johny: Yeah.
Brent: Walk in a bow tie.
Johny: Actually, the share part when we interview people is becoming the most fun part for me. I just love it. I just love funny and these quirky little things about these awesome photographers.
Brent: I know.
Johny: And that is an awesome one.
Brent: That’s crazy, yeah.
Johny: That’s wicked man.
Brent: And then the amazing image from Milford Sound and feeling the landscape, that’s awesome.
Johny: And I really believe you know, getting out that zoom lens is often landscape. We think wide, we think capturing everything but Man, getting out your telephoto and zooming in a part of your landscape, you can really create some great and unique images. You know, I absolutely love doing it. I absolutely love doing that, it’s good.
Brent: Just feeling, you know; having the landscape talk to you.
Johny: Yeah, that’s true Man. I’ve been out in nature.
Brent: You love that.
Johny: Yeah.
Brent: Look at where we are now Guys. We’re in nature.
Johny: It’s beautiful Man and beautiful location. And I totally agree Man, I have to feel it. It doesn’t matter what’s going on around me; if I’m not feeling it inside and I’m out there to capture, I’ll just sit and watch it. And sometimes that’s what happens.
Brent: And sometimes that not bad.
Johny: That’s great.
Brent: That’s sitting in nature and not even taking picture; just actually enjoying where you are and actually living in the moment.
Johny: That’s it.
Brent: Like Josh and I were talking about, happiness is actually enjoying the moment and not rushing towards the next thing.
Johny: Yeah, it’s true and you know what? We put pressure in ourselves too particularly when you’re learning. You see something and “I got to capture it” and you’re looking at the back of the camera and you know what? Sometimes it can get stressful, you know. And photography is not about that Man. It’s about out there having fun, feeling it and if you want to take a shot, you do and if you don’t, you don’t. Awesome, Man.
Brent: Yeah and Josh, thanks so much for that tip at the end there.
Johny: Yeah, awesome little Photoshop tip. And it’s such an easy thing to do Guys if you’re a Photoshop user. Have a go with that tip. I’m a big Lightroom fun but I still love Photoshop. There are certain things only Photoshop works and that’s an awesome little tip.
Brent: Yeah, thanks Josh.
Johny: Cool Man.
Brent: Guys, if you want to know more about Josh just click on the show notes below here or above or somewhere.
Johny: Or left or right.
Brent: He’s got something special there for you. We’ll put a link and it’ll be in the show notes.
Johny: Yeah, it’ll be on the show notes and check it out. He’s an awesome guy, you should follow his work. Man, his YouTube videos are fun.
Brent: I know.
Johny: It’s so fun.
Brent: Thanks Josh for being on the show. And hey Guys, we’ll catch you next week. See you later, bye.
Johny: Take care, bye.