
Discover the one must-have filter you need in your photography kit!
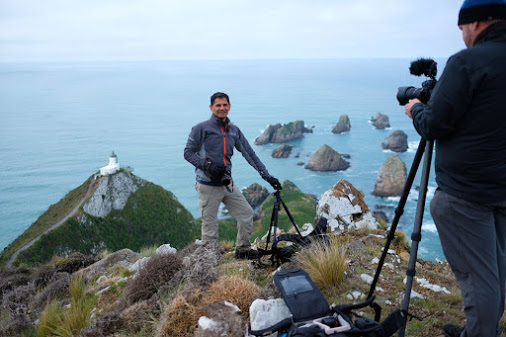
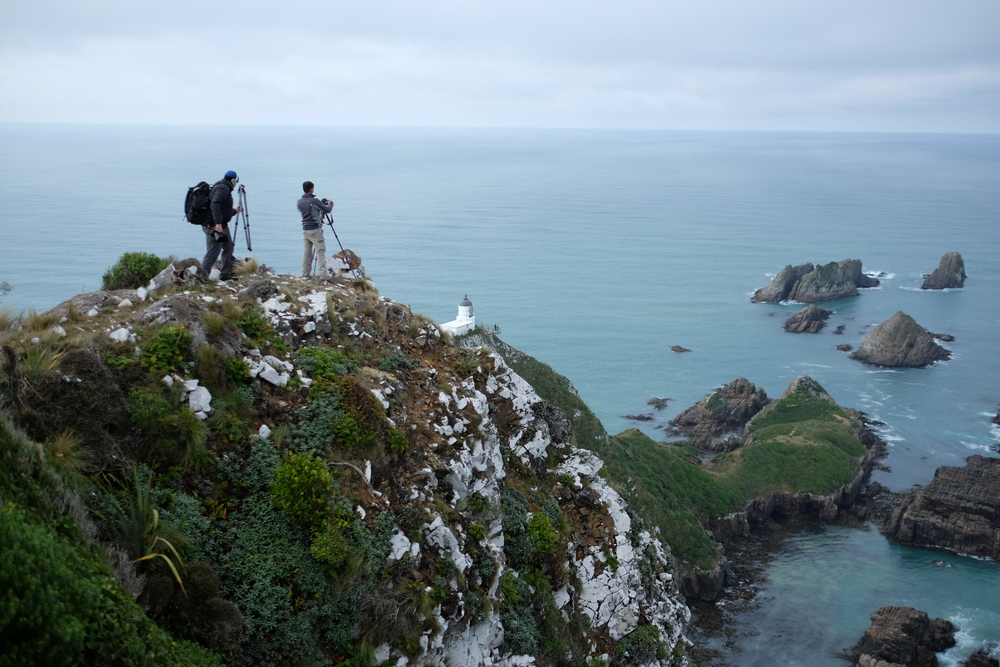
Share - On top of the world at Nugget Point, New Zealand.
Inspire - Why a polarizing filter was the key to creating this image.
Create - How to remove the blue blob of death using Photoshop and Lightroom.
Got a photography question or feedback from the show leave a comment below or hit us up on Twitter.
Johny's Twitter
Brent's Twitter
Want to find out more about the lounge here's a super deal just for you to take a sneak peek. here>>>
Enjoy the Show & Share this post to spread the photo love.
Johny & Brent
I want to
make
money from
my
photography
I want to
learn to take
stunning
Portrait
image
I want to
learn to take
amazing
Landscape
pictures
In this episode:
(01:44) Lighthouse in Nugget Point, New Zealand
(01:54) Feel like you’re on top of the world
(02:10) Creating memories
(04:04) Circular polarizer filters
(07:55) Types of polarizers
(11:17) Situations in using a polarizer
(13:25) Not for indoor type of photography
(16:04) Removing blue blob of death in Lightroom
(18:27) Removing blue blob of death in Photoshop

Episode Highlights:
Share - On top of the world at Nugget Point, New Zealand.
- getting into the source and actually finding out that there’s a better way to get a better shot
- Local knowledge
- creating all these other memories
Inspire - Why a polarizing filter was the key to creating this image.
Circular polarizer filter:
- have it in your kit
- the only filter you need
- you can’t do in post processing
1. LEE filter kit - foundation kit
- can have a polarizing filter and another 2 filters
2. Cokin filter
Different types of situation in using a polarizer:
- cutting the glare off the water and getting to see through that water.
- intensify the sky and makes the sky even so much blue
- street photography and you wanna look through a glass into a café
- don’t need a polarizing filter when you’re photographing portraits
- not for indoor type of photography
Create - How to remove the blue blob of death using Photoshop and Lightroom.
Removing in Lightroom:
- create a radio filter at the top of the blue blob
- make sure that it’s roughly similar to the shape of the blue blob
- make sure it’s inverted and feathered
- add the exposure
Removing in Photoshop:
- grab the marquee tool
- make a rough selection on the blue blob
- select refine edge button
- make it nice and filtered
- add a curve adjustment layer
- lighten up the side of the curves
- put enough feather
Introduction
Johny: Hey guys what’s up? It’s Johny here sitting. And welcome to another epic episode of the Share Inspire Create Show. I’m here with my main man B. How are you brother?
Brent: Man I’m cold today. It’s freezing here in Australia and its mid-winter. Johny’s on his crutches or his just sitting down because he’s still got a broken ankle. What do we got today Johny?
Johny: Man we got an awesome story from an absolutely massive location in New Zealand called Nugget Point.
Brent: Yeah and Johny’s gonna inspire with the brilliant image from that area Nugget Point and he’s also gonna talk about how to get rid of the blue blob of death in your images.
Johny: And how important circular polarizing adds to your kit. Let’s get into mate.
Brent: Let’s get into, enjoy.
On Top of the World at Nugget Point, New Zealand
Johny: Alright buddy how about that location in New Zealand that we’re filming. I know probably you have heard about this before but it was absolutely epic man; Nugget Point, the lighthouse there. You know the one thing I can remember about that besides the absolutely epic location and nearly fall into my death was walking up and talking to the ranger and getting access to the location right above the lighthouse. You know it’s just absolutely epic view.
Brent: And a lot of people don’t do like going, getting into the source and actually finding out that there’s a better way to get a better shot.
Johny: Local knowledge man you can’t beat it and that’s the tip. But I tell you what the one thing I remember too walking down between the trees and I had my hands sort of down and there’s that spiky bush and I prick myself and said “Yeah, they’re spiky, watch those” and I remember it was like hurting for days man and pulled the little prickles out of my fingers. Man we got out there and there’s this breath taking view and check out this image we got you can see Jay’s just getting setup there and I’m behind him just getting up to film him. And Brent’s walked back around that point there and gives it a bit of idea of where we are. You feel like you’re on top of the world mate.
Brent: Well you are because you take two steps and you’re gonna be at the bottom.
Johny: And another thing I’ve remember with that location was just really funny to and guys this is one thing that really excites me about photography is while you’re out there you’re creating all these other memories you know. It’s just so when you’re traveling with other creative people and one thing I remember is Brent’s new 5D Mark III setup on a tripod and we’re filming Jay, you and myself together.
Brent: A little quick tip with something.
Johny: Yeah that’s right and Melvin was behind the camera man and the wind, there was this gust of wind and like man I swear was gonna go off for you.
Brent: And that camera was a little bit old and the whole setup was a little bit tough heavy.
Johny: It is.
Brent: Coz I really like tripod with a very heavy camera and a mic on the top. And it was like “Woohhh”.
Johny: But anyway so awesome location, epic memories and I just can’t wait actually. Lets’ get into the Inspire coz I got an awesome image to show you with that location.
Brent: Okay.
Johny: It’s just absolutely epic man.
Brent: Awesome let’s jump right into it. Okay go.
Why a Polarizing Filter is a Key to Creating an Image
Brent: Hey guys just so you know you can see we’re both sitting today. And it’s because Johny’s still on crutches.
Johny: I am. I’m still crutching around the place.
Brent: Break his ankle a week and a bit ago.
Johny: I’m in the week 2. Just about week 2 now. So I still got the moon boot on and yeah you probably saw the last episode. If you haven’t seen anyway last episode I do the reveal. The big “moon boot reveal”.
Brent: Hey check it out.
Johny: It was a huge deal for me.
Brent: It was. You’ll see Johny’s legs, naked legs.
Johny: Yeah great.
Brent: And just so you guys know I’ve got to drive 15 minutes each way to pick up Johny first thing in the morning. That’s how we got beanies on coz its freezing cold; mid-winter here in Australia. And then get back here to my garage which is freezing too. And we’re basically sitting on a heater. Anyway back to you.
Johny: Alright man, so I’m gonna show you this image and just take a few seconds to take it in. We need that music now.
Brent: Yeah Russell put that in.
Johny: Yeah put that in Russell. So anyway, check out this man, just breathtaking. It’s just absolutely amazing. And you’ll find out why these tides in a minute. We’re gonna talk about polarizing today. And obviously this shot Brent I’ve used the polarizing. You know how you can tell? The dead giveaway you that could tell that I’ve used the polarizing in this shot.
Brent: The shifts in the water?
Johny: Look at that water. I mean that in the bottom sort of rise above that massive watermark that I’m gonna have to get rid of coz it’s a bit too big. That’s a big watermark. Anyway that’s another show. But you can actually see through the water there. And you can see the bits of seaweed coming through the water. You can see the discoloration there from the sand after that waves gone three. You can see the yellow down the bottom there. And that’s a dead giveaway and the intense blue of that water. That’s a dead giveaway that I’ve used the polarizing.
Brent: Yeah totally coz you can see the difference between my image and yours. This is obviously straight off the camera. I haven’t done anything to it. And the water’s dull and kind of lifeless.
Johny: It is. Definitely man and you can see the other thing that’s a bit of a giveaway is have a look at those highlights at the back there.
Brent: There’s so much more intense.
Johny: They are intense but the highlights have been pulled back out there. You can see it and look at the lighthouse okay. So the lighthouse is the brightest thing in this image. And it was in the day too.
Brent: The sun is hitting it.
Johny: When the sun shot, the sun just coming through a thin layer of clouds. So it wasn’t overcast day but the sun did actually come out just for that little bit there you know. It was still being filtered by cloud from memory and it was off 90 degrees and we’ll talk about that in a minute. And you can see the highlights up there those rocks right out there it sort of been pulled back and the polarizing actually does that as well. So it pulls some intensity out of those highlights as well as giving me the edge to look through the water there which you can see. And man just made those blue so much more intense. I just love it. And the other added bonus to that too is when you’ve got sort of harsh light on greens as well. The polarizer are actually intensified those greens. So there you go. I mean I just love this image. That’s one of my favorite images and you know we always say you know “you always often know what we say” but we always hear what photographers say man. “Oh you got to get up there and get a good light and get out there”.
Brent: You don’t have to.
Johny: Man you don’t have to. I tell you what there’s so many great images. I mean this is a prime example. This was in the middle of the day.
Brent: It was.
Johny: You know it was in the middle of the day and this is one of my favorite images. I really love this.
Brent: And you know being that far south in the south island of New Zealand. You know the sun is pretty far north.
Johny: It is.
Brent: By being you know autumn or going into winter. So even in the middle of the day the sun is not right above us shining down. It’s kind of to the north or off access a little bit. So the polarizer really works well.
Johny: It does, so the general rule of thumb a polarizer particularly when you’re shooting a big wide scene open where you can see the sky and you wanna look through the sky particularly you know. When you can see sky and intensify the sky, polarizer works best when the sun is around 90 degrees to the direction you’re shooting.
Brent: Yes.
Johny: And it was here. You can see the shadow. The shadow’s just down the end of the line. It has followed the lean line out there. You can see the shadows and the sun is directly 90 degrees.
Brent: 90 degrees, so that’s where you get the most polarization.
Johny: That’s right, it is. And we have to talk about something called the blue blob of death a bit later. And if you get the polarizer wrong I mean it’s one of the most important filters to have in your kit coz it’s something that you cannot just duplicate a post mate. You need to have it in your kit. It’s a must you know.
Brent: Actually I’ll say it’s the only filter you need.
Johny: it is. You know if you didn’t have any filter and you wanted to go and buy your first filter. It’s the very first you’d buy. And probably the only one you could probably get away.
Brent: Circular polarizer filter.
Johny: Circular polarizer yup sure man and we’ll talk about a couple of different options in a minute. But yeah man without a polarizer I would’ve never created this image. And it would never be as intense and as beautiful as it is you know without a polarizer.
Brent: And it’s one of the other things that you can’t do in post processing.
Johny: You can’t.
Brent: You can’t actually see through the water if you can’t see through the water. There’s nothing you can do in post processing.
Johny: No, nothing.
Brent: That’s the one filter you have to have in the field to capture those amazing images.
Johny: Yup for sure man. So I just wanna show you a couple of types of polarizers. This one here is just a plain old round circular polarizer and it just screws, I’ll hold that up so you can see. It screws straight in the front of your lens. And this comes in different sizes. But what I would recommend you doing guys or the best way to do it is 77 is around you know the one that sort of fits all your wider angle lenses.
Brent: Well at least ours.
Johny: Yeah I mean if had a Mark III full thirds or a mere less system it might be different but most DSLR’s are around 77. But what I would recommend doing is buy the biggest filter or the biggest circular polarizer size that you need to fit your biggest lens. And instead of buying different ones if ever have the lens that’s smaller just buy step in ring or step up ring whichever you wanted. A step up would but whatever. But anyway coz they’re a lot cheaper. They worth nothing and you got to screw them on and then you can just adapt the bigger filter to your different smaller lenses.
Brent: And also if you do a lot of wide angle work it’s good to get a step up rings. So say you’ve got a small diameter front of your wide angle lens you step it up so you actually got bigger polarizing filter in the front of your wide angle lens. Why do we do that Johny?
Johny: It’s gonna stop you from vignetting. So when you start obviously this is another one but we’ll talk about this one in a minute. When you start to get further away from the front of the lens obviously your lens start or the filter starts to encroach on the side of your lens.
Brent: And your wide angle lens is pretty wide so basically the wide angle lens, the lens is looking at almost close to 90 degrees out depending on how wide it is so that’s why you need a really big polarizing filter in front of a wide angle lens that you actually don’t cut it off. And I get the vignetting.
Johny: That’s it. Man you wanna tell us about this type of polarizing?
Brent: Yes totally. Okay so what I got here guys is a circular polarizer in front of my LEE filter kit. I think this is called the foundation kit the LEE filter. Kit filter holder. So the circular polarizing filter on the front so I can turn it around and get the maximum polarization that I want like the water or get the glare out of the water or the sky. And then in the back here I can actually put my graduated neutral density filters in the back all my ten stop filter which I love. In the backyard I get those long exposure images and I can move my filter up and down and I can get the polarizing to work. I can stack filters together so I can have a polarizing filter and another 2 filters before the light actually goes into my lens and I capture it.
Johny: So we do have a couple of options guys like I know some of these systems I remember I have another brand and it was called Cokin and I didn’t have the polarizer. So what I actually do is mount my circular polarizer on first and then put the system on the top man. And it doesn’t really matter which way or where you have the polarizer in your filter system. You can go before your indies or your grads or after it makes no difference.
Brent: it doesn’t matter.
Johny: Yup and I know Jan and Varina used another system where the polarizer filter is actually built in first. And they can turn this. So it doesn’t matter where you really have it when you go with this type of filter system.
Brent: Yeah and I guess it just the convenience coz I know with them they where I think it was battling a little bit to turn it from the back. Because it was behind the other filter so it wasn’t as accessible and easy to get to.
Johny: Yeah that’s true. So yeah that’s the different types of filters. Now there’s different types of situation where you used a polarizer filter isn’t it buddy? So the number one we’ve already talked about is cutting the glare off the water and getting to see through that water. I mean that’s a classic example where you use a polarizer filter. The other is if you really want to intensify that sky it’s just bring down the, what am I trying to say Brent?
Brent: well it makes the sky even so much blue and so much more intense. And if you got some clouds in the sky the contrast between the light clouds and the dark blue amazing when you’re using a circular polarizing filter.
Johny: Yeah so another great place to use it is say you’re doing some street photography and you wanna look through a glass into a café, cut the reflection off the glass you know. That’s another place you can use it for that type of photography. Another classic example is if you’re in a forest sort of situation and that’s like a cloudy day and you’ve got those harsh little highlights. I really notice that if you got those harsh little highlights all over the greenery you know you put the polarizer on and turn that bad boy man it just cuts it away and just changes the dynamic image just amazingly. So have worst guys is a wave and Brent’s gonna help me with this coz he’s a bit more technical but basically a wave travels in light.
Brent: Light is a wave.
Johny: Light is a wave yeah so and it’s like on the polarizer filter there’s like these different bars but you can’t really see it but as you turn the polarizer depending on which way you got a waves of light coming at you the bars will block that part of the wave of light won’t it mate?
Brent: Yeah so it absorbs a certain angle of the light I guess. So that’s why when light reflects of the surface of the water you can actually turn the polarizing filter and only absorbs the reflected light of the top of the surface. That’s why you can see in because you can see the other light. The other angles of light I guess.
Johny: That’s it. So that’s pretty much why you need a polarizer. Man, go and grab one because it’s just essential to have in your kit and it is so useful. Like we say you cannot reproduce the effect you didn’t create in post so it a must have man.
Brent: A must have filter.
Johny: I brought this little bad boy with me everywhere.
Brent: Okay there’s one thing where you don’t actually need a polarizing filter and that’s when you’re photographing portraits.
Johny: Okay.
Brent: Sometimes polarizing filter can affect the autofocus of your lens of your camera.
Johny: Well that’s something I haven’t mention too mate as you know compensating with your exposure when you put a polarizer on.
Brent: Yeah the exposure too. But I’m talking about auto focus. If you’re photographing portraits and not landscapes I’ve tried it and the polarizer filter is not great when you photographing portraits.
Johny: Okay that’s a good tip.
Brent: Or if you endorse.
Johny: Yeah of course it’s actually useless.
Brent: Yeah makes it really dark.
Johny: yeah sure.
Brent: So there’s really no reflection you need to take off indoors I don’t think that I’ve experienced. I mean we’re not photographing real estate photography and you know you got this side and you got the polarizer filter on and you’re shooting because you want the nice dark blue sky. And then you forget to take it off and you walk inside and you kind like take photos and you got all the flashes on and you’re like “why is it dark? Why so dark?” and you forgot you left the polarizer filter on the front of your lens.
Johny: Yeah that’s it. That’s so funny man. Yeah so definitely not indoors and it sounds like definitely not for portraits. That’s a great tip man. One thing I would say is just remember when you do put the polarizer on, and there is gonna cut back the light you will have to adjust your exposure when you put it on. I mean to be honest before I had any indie filters Brent this is a little tip too. I would screw the polarizer on and it just cuts away just the touch of light and you get to get that slightly longer exposures you know. You just gonna make sure that when you’ve got to turn the right directions so you’re not getting the big blue blob of death.
Brent: Great and you also get this there’s something called Variable Indie Filter where you can actually vary the light that it cuts out. Which is basically 2 polarizing filters back to back on the front and you actually turn it in and they both cut out the different light but there’s a point where it actually show some funny things in your image.
Johny: Yeah it gives us this cross hatching.
Brent: Which is basically two polarizing on top or two polarizing filter on top of each other.
Johny: That’s probably that what you’re seeing is like the point where the two lines that come to the filter there they come across and creating that. Cool man, polarizers are great. Go and grab one and let’s get into the Create buddy.
Brent: Okay awesome.
How to remove the blue blob of death using Photoshop and Lightroom
Brent: Okay buddy teach us something.
Johny: Yeah okay guys. So say you go out and shoot with a polarizer. And you bring your images back and your sky is all wacked out with this big blue blob. I call it the “blue blob of death”.
Brent: It is.
Johny: And Russell’s on the video guys if you haven’t figured that out. So anyway, I’m gonna do this both in Lightroom and Photoshop. And this is an image I took years ago. And you can see I’ve always had a polarizer in there. And it looks absolutely terrible. You can see what’s happening. It’s got this big blue weird radiant looking thing and basically why I got that big blue blob is because the sun you can see is just off to the left of this image and it’s not even 90 degrees.
Brent: Hey buddy what’s that funny looking structure over there?
Johny: That happens to be the Opera House. Not the Opera’s House it’s the Opera House.
Brent: Well I think she could probably afford.
Johny: She probably could afford two of them. So anyway, not a great image guys but that’ okay. It’s a cool location and you can see it’s crowded as hell that day. Sunday afternoon drinks at the Opera Bar man. Alright let’s get into it guys.
Removing blue blob of death in Lightroom
Johny: I’m in Lightroom here. I’m in the develop module. I’ve just done some basic editing on this image. We’re gonna jump over here. Let me close this. Let’s jump over to the radio filter. And basically what we wanna do is we’re gonna create a radio filter at the top of the blue blob. And we’re just wanna make sure that it’s roughly similar to the shape of the blue blob. We can change this after we add the effect okay. So one thing I wanna do I wanna make sure it’s inverted and I’m gonna make sure it’s feathered. And we’re gonna apply this father again in a minute. I also wanna do guys is we want to have exposure. Okay so just add the exposure.
Brent: Oh lovely. Look at that.
Johny: And look at that. It’s gone.
Brent: It’s gone.
Johny: And now what you would do is you just move this around and you can change the feather by moving this in and out here as well. Just to fitting that area you want to take away. So if I close that there and I’ll give you the before and after; that’s before and actually that’s right before. Let me jump in the history panel. I wanna show the before and after the radio filter. So if we go before the radio filter and after. What have I done there? Let’s go back a bit. Add radio filter. And up to there. So there’s the before and after that radio filter there. And you can see it’s quite an easy fix. Now there’s a couple of other things you may want to do there. Sometimes you get a weird radiant down the corner and sometimes radiant tool is better to do this okay. It all depends on how the blue blob of death looks. And what you need to do. And other times even after you’ve added maybe a graduated filter you may wanna go and touch it up with a brush. So it’s a bit of “hit and miss” with this sort of technique. But that’s the rough sort of things. You wanna get the blue blob and you wanna lighten up. And now I could go ahead and add my radiant filter and darker the sky down and balance that whole sky back out. So there you go. That’s how I do it in Lightroom.
Removing blue blob of death in Photoshop
Johny: Now I wanna try in Photoshop. A little bit of different in Photoshop. Actually I think Photoshop is good. I mean it’s a few more steps and sometimes you know Lightroom I just can’t get rid with Lightroom you know. So I have to take it with Photoshop to create this blue blob of death. But first thing I’m gonna do is command J coz I’m almost gonna duplicate the layer because Photoshop is a destructive editor. I just wanna always go back to my original image buddy. So first thing I’m gonna is grab the marque tool there. You see I’ve already got it selected.
Brent: Okay can you zoom in a bit of the image?
Johny: Yeah I can.
Brent: Okay just a little bit bigger.
Johny: Yeah I can do that.
Brent: Cool.
Johny: So basically I’m gonna give myself a bit of space on the blue blob of death okay. So I’m just gonna do a rough selection around here.
Brent: That’s where the blue blob is bleeding.
Johny: Yeah the blue blob of bleeding. Anyway so I made a rough selection there. I’m gonna refine it. And you may need to do this a couple of times okay. Okay let me go back. So at the top here I’ve got the refine edge button in my selection so I hit refine edge. And what I wanna do is I wanna filter this out to the wild zoo. I don’t know how far that is but it’s a long way. I wanna make it nice and filtered guys okay. Maybe so I’m just watching that corner up there. So let’s see what we got here. You know sometimes with the selection and filtering you may need to go back and do it again. It just depends you know. So I’m just taking a bit of a guess on what I need for this one okay. So we’re gonna hit “okay” okay. The next thing I’m gonna do is I wanna add a curves adjustment layer. So I’m gonna get down to the bottom here. Hit this and I’m gonna go curves. So basically also wanna do as you can see because I’ve had that selective look at the mask down here in my layers. It’s actually made of selection to that area there so I’m just gonna bring or lighten up this side of the curves. And let’s just see what happens. Let’s see if I put enough feathers on there.
Brent: I love it.
Johny: So there you go. It’s not too bad. You can see I probably could’ve feathered that a bit more coz I’m getting some vanning around in here. You see the light is probably too much. And there’s a bit of “hit and Miss” with this okay. There’s no like exact rule of thumb. But that’s the basic way I would fix the blue blob of death in Photoshop.
Brent: Okay.
Johny: You can see if I have a bit of more time I would actually delete that curve layer and make another selection and probably feather it a bit more. That’s what it needs. It needs more feathering. So it is a bit “hit and miss” in Photoshop.
Brent: So basically what you’re doing there is you’re highlighting the dark areas with the curves layer right.
Johny: Yup so I’m lightening the dark area.
Brent: Lightening the shadows.
Johny: Yup. That’s basically it. I’m lightening it up with the curves layer.
Brent: Okay.
Johny: You can see there’s the before and after. It’s not too bad. I could do a better job with that one. I would make another selection but yeah that’s basically the two ways of fixing the blue blob of death. Of course you know the first way is not to get it in the first place you know. So just be very careful when you put your polarizer on. Yes it’s a useful filter but when you’ve got blue sky and you got that sun direction. You got the sun in the wrong place from the direction you’re shooting, you know it’s gonna create that blue blob.
Brent: And going with a really wide angle lens. And turning the polarizer to the max; that’s where you get it.
Johny: Cool, awesome man. So that’s the ways I get rid of it in post. And man it’s been another epic show hasn’t it?
Brent: Yes great. Thanks for it Johny. I have learned something getting the blue blob of death.
Johny: And how useful the polarizer filters mate. We recommend you go grab one. Get it in your kit and don’t forget the experiences you can have when you’re out there with your photography because it’s not always about photography. It’s often about the people you’re out there with and the memories you create. Man that is one of the most…
Brent: And the adventure.
Johny: Yeah
Brent: Get into a spot and photographing. I’ll never forget the Nugget Point in New Zealand. Guys if you’ve never been there, it’s got to be on your bucket list. It’s one of the places that’s right at the bottom of the South island of New Zealand. And it’s epic.
Johny: Yeah absolutely epic man. It’s been another huge week for me. I’m crutching around with my crutches bro. But I’ll be spending heaps of time in the Share Inspire Create lounge. And guys check out the special we have for you below. It’s a little sneak peek there to get you in and to have a look at about what’s going on in our awesome photography community isn’t it buddy?
Brent: I love it and you know right now we got the rule of thirds assignment. And everyone’s adding images and commenting and you know inspiring and motivating everyone to keep going. So that’s what I love about the lounge.
Johny: it is man and photography is just like you learning and growing and craft together man. Absolutely awesome. Alright guys, been another epic show. Get out and buy that polarizer and look there are different of types that you can buy as in brands and price ranges you know. But just get the one you can afford and man you won’t regret it coz it’s absolutely awesome. Have a great week guys. And we’ll see you next week.
Brent: See you next week. Cheers.